
Microwave Neck Warmer Tutorial
This neck warmer, filled with rice and heated in the microwave, is a great replacement for yesterdays' hot-water bottle. The rice-filled warmer heats up quickly in the microwave and is ideal whenever a little heating boost is desired. We use them for relaxing tired muscles, tossing under a throw/quilt while watching TV, and under the covers to warm up our toes when turning in for the night.

This tutorial outlines the steps to make two different-size warmers. The finished larger warmer (gray chevron in the images) measures ~6.5"W x 15.5"T and has three sections. The smaller version (green with trees) measures ~6" W x 13"T and has two sections. Please read through the tutorial completely before getting started or buying any materials.
Skill level: Beginner
Time: 30-45 minutes for the first one, under 30 minutes for successive warmers.
Supplies:
- Fabric:
- 14"W x 16"T piece for the longer warmer
- 12"W x 14.5" T piece for the smaller warmer
- I used decorator weight in this tutorial from some left over projects — however you can use quilting cotton just as easily.
- Rice—long grain:
- 750 grams (1 lb 11 oz) for the longer warmer
- 680 grams (1 lb 8 oz) for the smaller warmer
- Dried lavender—optional, but use sparingly if used.
- Thread
Tools:
- Sewing machine
- Scale & container to weigh the rice
- Iron
- Scissors
- Scale
- Vanishing marking pen (I use Pilot Frixion pens which disappears when the heat of an iron is placed on the mark).
Step 1:
Cut a piece of fabric with the following dimensions:
- Longer warmer = 14"W x 16"T
- Smaller warmer = 12"W x 14.5"T

Step 2:
Fold the cut piece of fabric with right-sides together, in half lengthwise so it is now ~7" wide for the longer warmer or 6" wide for the smaller one.

Stitch down the long side and across one of the ends with a 1/2" seam allowance. For added security, it is advisable to stitch over these lines a 2nd time. This will yeild a sleeve with one open end.

Turn the created sleeve right side out. Push out the corners of the bottom end of the sleeve.

TIP: Be careful not to use anything to sharp to push out the corners, the rice is small and if a hole is inadvertently created while doing this step, rice will leak out. One option is to use a pen with a cap on it. It is narrow enough to push the corners out enough, but doesn't run the risk of creating a hole like a sharp implement would
Step 3:
The sleeves are divided into sections to keep the rice more evenly spread throughout. At this point, before the rice is added, the sleeve should be marked for where the sections will be sewn after filling.
Use a vanishing marker in this step and place marks on each side of the sleeve. These marks signify where each section will be stitched closed.
For the longer warmer, marks will be at 5" increments (e.g. you will have a mark at 5" & 10"). For the smaller version, 1 mark will be made at ~6.5" (e.g. halfway).

Step 4:
Once the sleeve has been marked for the sections it's time to weigh the rice.

Rice Requirements:
| Larger warmer | Rice required |
| Section 1 | 250 g |
| Section 2 | 250 g |
| Section 3 | 250 g |
| Smaller warmer | |
| Section 1 | 340 g |
| Section 2 | 340 g |
Put container on the scale to measure the rice for the first section. Using a rectangular bin made it slightly easier to pour the rice into the sleeve.
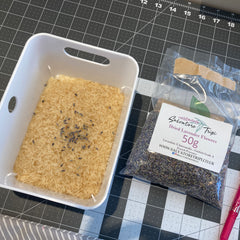
If dried lavender is being used, add it sparingly at this point. It is a strong scent, although it does seem to fade over time.
Pour the rice into the first section of the sleeve. Ensure all the rice has fallen to the bottom of the sleeve.

Now, place the sleeve gently on the sewing machine, ensuring that all the rice is pushed over to the side and sew a line between the marks placed on the fabric in Step 3, making sure to back tack at both the start and end.

For the longer warmer, repeat Step 4 for the 2nd section of the warmer.
For both warmers, move on to Step 5 before filling the final section.
Step 5:
This step is for the 3rd section of the longer warmer and the 2nd half of the smaller warmer.
Before putting the rice into the final section of the warmer, turn the raw end of the fabric into the sleeve creating a 1/2" fold, and iron it to set. Then measure out the rice for the final section as outlined below and add the dried flowers to it (if using). Pour the rice into the last section of the sleeve.
| Larger warmer | Rice required |
| Section 3 | 250 g |
| Smaller warmer | |
| Section 2 | 340 g |

As with each of the other sections, it is time to sew the remaining section closed. Stitch along the open edge of the bag. Ensuring that both ends of the fabric are getting sewn through so that there won't be any leakage of rice. Stitch over this section a 2nd time for added security.

To Use:
Place the wrap in the microwave and heat for 1-2 minutes. Microwaves operate at different wattages, so make sure that you are testing your wrap out and take care not to apply a warmer that is too hot to bare skin.
These warmers are ideal heat boosters and can be used over and over again.
As always, let me know if you have any questions!
Best,
Lisa
Are they safe to laundry? What’s recommend?
The fabrics that I used on both of the neck warmers in the post are comprised of cotton canvas. I would stick to 100% cotton, flannel, wool and linen. Other fabrics or blends may melt and become a fire risk, so I would avoid them.
thank you for the neck warmer instructions. Should the fabric be 100% cotton for microwave use or does it matter? Thank you.