
Adirondack Head Pillow Tutorial
When I first saw Adirondack Chair Head Pillows in a garden store about a decade ago, I thought ... I really need to have some of those!

About 2 years ago I started fiddling around with how to make them and settling on what I felt were the best dimensions and materials and then began selling them in my store on Etsy, and now here on my website.
If you've decided that it's time to increase the cuteness and comfort factor on your Adirondack chairs, but want the look without the work ... feel free to peruse my shop, where you can search by color or fabric print for pillows that are perfect for your chairs.
For you DIYers ... the following instructions are for you.
Requirements for 1 set of two pillows:
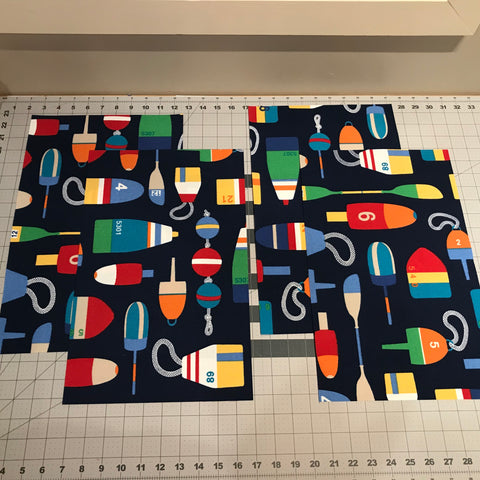
- Outdoor fabric—4 cut rectangle panels at 10.25" x 16.25" in dimension.
- Yardage requirement is 1/2 yard if using a non-directional fabric
- or 5/8 yard if using a fabric with an obvious direction (see fabric layouts below).
- 1.5" Elastic—each pillow uses 16", the pillows in this DIY tutorial are made with eBoot elastic
- Outdoor thread—the thread used in this tutorial is Coats & Clark
- Fiber Filling—12 ounces of polyester fiber fill (each pillow uses ~5.3 oz)
- Scissors
- Ruler/measuring tape
- Marking pen/pencil
- Sewing machine
Step 1—The Fabric:
Recommend using outdoor fabric for this application. Although all fabrics will eventually fade, outdoor fabrics are typically made from polyester fiber and are treated for both fade and moisture resistance, which does help prolong the life of your outdoor project.
Outdoor fabrics typically come in 54" widths and the following layout show how to cut fabric to yield 4 rectangle panels (the second layout is for fabrics with an obvious pattern design.
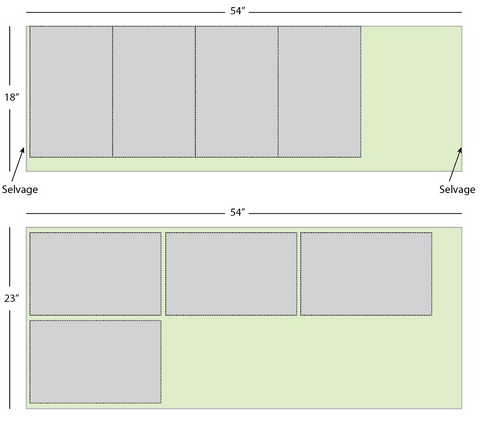
When finished, you will have 4 rectangle panels that measure 10.25" x 16.25" each.
Step 2—Stitch along bottom edge
As outdoor fabrics are woven, it can ravel at the edges. Once the pillow is sewn together, the risk of unraveling is mitigated, however, the bottom edge of the pillow will get additional handling as the pillow is stuffed and then ultimately stitched. So you will want to put a bit of a finish on the bottom long-edge of each rectangle panel.
Even if you don't have a directional fabric, sometimes a fabric may look better one way of the other. So first decide which edge you want to be the bottom on each rectangle panel. Then use a serger to stitch along that bottom raw edge (if you don't have a serger, a zig-zag stitch along the raw edge will accomplish the same thing).

Step 3—Cut the elastic
Cut two pieces of 1.5" elastic at 16" in length each.

Step 4—Assemble the pillow
Select 2 rectangle panels and put a small mark at the mid-point on each short end (10.25") on the wrong side of the fabric.

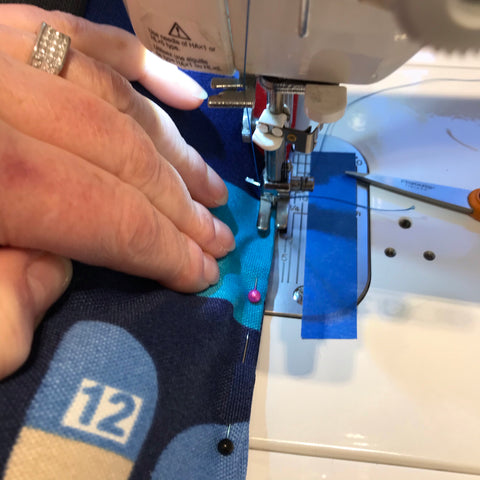
Fasten an elastic piece to each end of one of the rectangle panels. The elastic should be on the right side of the fabric. Repeat with the 2nd marked rectangle panel and elastic piece.


Right sides together, pin an unmarked rectangle panel to one of the ones with the elastic attached to it. Repeat with the final 2 panels.

Step 5—Sewing the pillows together
Stitch around the perimeter of the sandwiched rectangle panels with a 1/4" seam allowance. Begin sewing along the bottom edge that's been serged, about 3" from the end and stitch towards the end. Continue stitching all the way around and until you return to the bottom of the panel. It is important to leave ~6" open on the bottom so that there will be room for your hand to fit in as you put the stuffing in. Typically, I measure this when I am pinning the panels together and measure the 6" along the bottom and place a straight pin at either end of where I want to begin and end the stitching.

Trim the corners.

You will need to use something to push the corners in as you turn the pillows right-side out. Make sure you don't use something that is too sharp, as you can puncture the fabric by accident if you do. I use my sewing scissors, which as you can see don't have a very sharp end on them.


Step 6—Stuffing the pillows:
Polyester stuffing is typically shipped in vacuum packed plastic. So open the plastic and spend a little time pulling the stuffing apart. The objective is to have it loose as it goes into the pillows, not clumped up as happens when it ships.
I fill each pillow with 150 grams (5.3 oz) of poly stuffing. Experience has taught me that this is an ideal amount of stuffing for this size of a pillow.


Begin stuffing the pillow, focusing on getting sufficient stuffing down into the corners.


Repeat with the 2nd pillow.
Step 7—Finishing it off:
Once the pillow has been stuffed with the poly filling, pin the opening closed with straight pins. Make sure the pointy end of the pins are facing away from you so that you can remove them as you stitch on the machine.

You may choose to hand stitch the closing, but I find that a machine can stitch it as well.
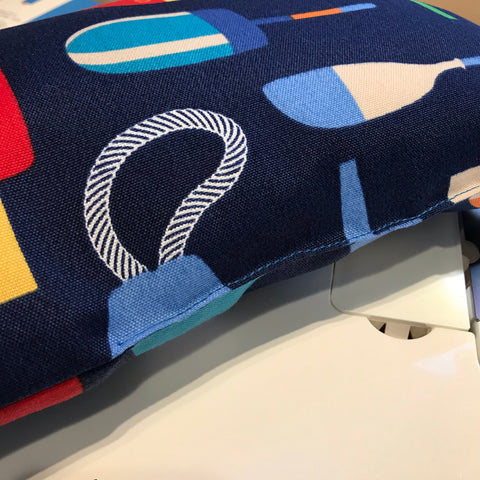
Your finished!
The pillows easily attach to the back of the chair.
If you have the plastic resin chairs, it is simple to split the elastic in the middle and stitch a piece of hook & loop tape on either end. (TIP: when splitting the elastic this way, you may want to use a lighter or match to lightly burn the end of the elastic where you have cut it so that it doesn't run—black elastic works best).


The black tends to recede where white will stand out. Of you can find an elastic the same color as your chair, that is best, but I found that the white looked like a bandage across the back of my chair where I didn’t really see the black. Hope the came out great!
Thank you for these detailed directions. I’m going to give it a try. Just wondering why you say black elastic works best. Is the elastic available by the yard anywhere you know of?